How to Build Your First Google A2A Project: A Step-by-Step Tutorial
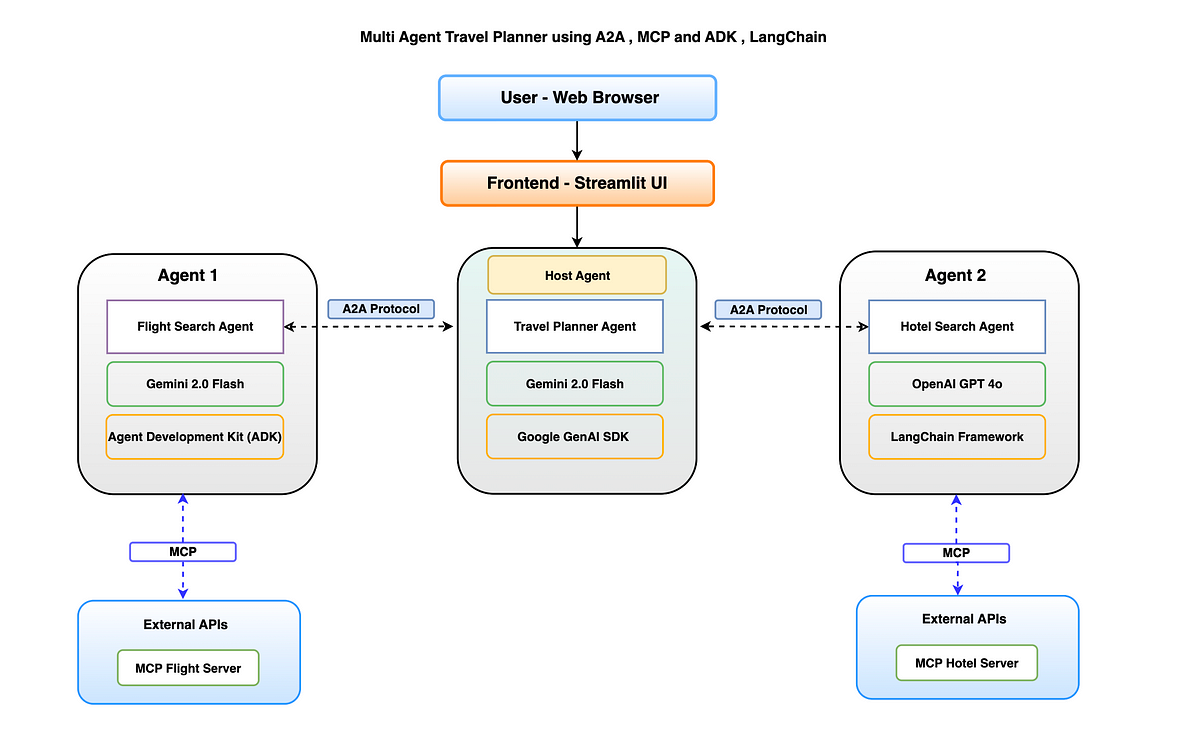
Google's A2A protocol has revolutionized AI agent development. It creates smooth communication between different AI frameworks such as LangGraph, CrewAI, and Google ADK. Google introduced this open standard that breaks down traditional barriers between AI agents. Now these agents can cooperate through a universal HTTP-based protocol.
This tutorial will help you build your first Google A2A project from scratch. You'll learn to make use of the Agent Development Kit (ADK), Google's production-ready framework that runs their own products. The A2A protocol comes packed with innovative features. These include rich content exchange, structured JSON support, and quick task delegation systems.
After completing this tutorial, you'll master how to:
- Set up a complete A2A development environment
- Create A2A-compatible agents using Google ADK
- Implement agent communication using the A2A protocol
- Handle multi-agent systems with parallel and sequential workflows
Time to start building your first A2A project!
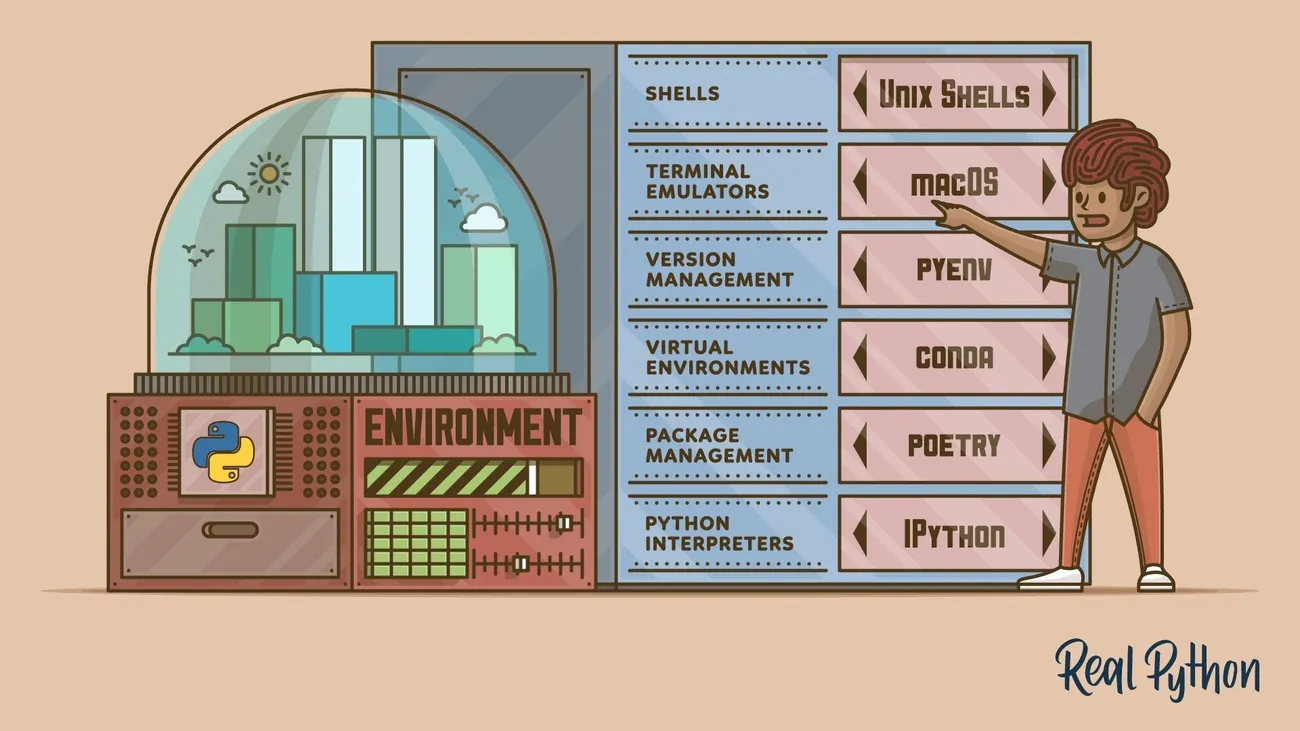
Setting Up Your A2A Development Environment

Setting up a proper development environment is the first step to build with Google A2A. You need specific tools and configurations for A2A to work correctly, especially when you have multiple agent frameworks running at the same time.
Installing Python 3.12 and uv for virtual environments
The official documentation recommends Python 3.12 or higher to build A2A projects. While pip works fine, Google's A2A samples suggest using uv - a modern Python package manager that runs 10-100 times faster than pip.
Here's how to get uv based on your operating system:
## Linux or Mac

curl -LsSf <https://astral.sh/uv/install.sh> | sh

## Mac (via Homebrew)

brew install uv# Windowspowershell -c "irm <https://astral.sh/uv/install.ps1> | iex"

## Any OS (via pip)

pip install uv
Check if everything works by running:
uv --version
Virtual environments are vital for A2A development. They keep project dependencies separate and prevent conflicts between agent frameworks that might not work well together. The speed of uv becomes really valuable when you manage the many dependencies needed for multi-agent systems.
Cloning the A2A GitHub repository
Let's get the official A2A code and samples:
git clone https://github.com/google/A2A.git

cd A2A
The repository has everything you need to start working with Google's A2A protocol. You'll find:
- Sample A2A clients and servers in Python and JavaScript
- Multi-agent web applications
- Command-line interfaces
- Example implementations for different agent frameworks
Now create a virtual environment in the project root:
## Create virtual environment

uv venv

## Activate on Linux/macOS

source .venv/bin/activate

## Activate on Windows (CMD)

.\.venv\\Scripts\\activate.bat

## Activate on Windows (PowerShell)

.\.venv\\Scripts\\Activate.ps1
Installing dependencies for LangGraph, CrewAI, and ADK agents
The A2A repository has different dependencies for each agent framework. Here's how to install everything properly:
# Navigate to Python samples directorycd samples/python# Install common dependencies + LangGraph + ADKuv sync# For CrewAI-specific dependenciescd agents/crewaiuv sync# Return to main samples directorycd ../..
Each framework has its own requirements:
1. LangGraph agents need Python 3.13+ and use environment variables for API keys:
cd samples/python/agents/langgraph

echo "GOOGLE_API_KEY=your_api_key_here" > .env
2. CrewAI agents work with Python 3.12+ and similar API setup:
cd samples/python/agents/crewai

echo "GOOGLE_API_KEY=your_api_key_here" > .env
3. Google ADK agents connect to various data sources through the Model Context Protocol (MCP). This lets your agents use tools from LangChain, CrewAI, and others.
Tools like Trickle AI help you see agent behaviors and communication patterns. This becomes really helpful as your A2A systems grow with multiple agents talking to each other.
Test your setup by running a simple A2A agent. Here's an example with CrewAI:
## Run the agent

uv run . --host 0.0.0.0 --port 10001

## In a separate terminal, connect with the A2A client

cd samples/python/hosts/cli

uv run . --agent <http://localhost:10001>
Your development environment is now ready to create and test A2A-compatible agents with different frameworks.
Creating Your First A2A-Compatible Agents

Let's create our first A2A-compatible agents using Google's Agent Development Kit (ADK) now that our development environment is ready. The A2A protocol lets independent AI agents communicate with each other whatever their underlying frameworks are. This makes building sophisticated multi-agent systems possible.
Defining agent logic using Google ADK
Google ADK offers a simple approach to agent creation through several agent types. The BaseAgent class forms the foundation of all ADK agents, and you can extend it in different ways:
## Basic LLM Agent example

from google_a2a import AgentCard, AgentCapability

from google_adk import LlmAgent

## Define your agent logic

class WeatherAgent(LlmAgent):

def __init__(self, agent_id):

super().__init__(agent_id)

## Configure agent behavior

self.instruction = "You're a weather information agent. Provide weather forecasts and data."         # Set up tools and capabilities
Google docs show that ADK agents work on an Event Loop architecture. The Runner component coordinates communication between your defined "Execution Logic" and external services. This design lets agents handle concurrent operations efficiently without blocking.
You can create these three agent types:
- LLM Agents - Use language models for natural language understanding and reasoning
- Workflow Agents - Control execution flow of other agents in predefined patterns
- Custom Agents - Implement unique operational logic by extending BaseAgent directly
Trickle AI helps visualize communication patterns between your A2A agents. This makes debugging and optimization much easier when you monitor complex agent interactions.
Setting up the AgentCard for discovery
The AgentCard is a vital part of the A2A protocol - it serves as a digital identity card for your agent that shows its capabilities to other agents. It works like a résumé that helps other agents decide if and how they should connect:
## Agent Card definition
class ResearchAssistantAgent(AgentCard):
	def __init__(self, agent_id, specialization):
    	super().__init__(agent_id)

        # Define agent-specific capabilities
        self.capabilities = [
        	AgentCapability.NATURAL_LANGUAGE_PROCESSING,
            AgentCapability.DATA_ANALYSIS,
            AgentCapability.KNOWLEDGE_RETRIEVAL
        ]

        # Set metadata
        self.metadata = {
        	"domain": "scientific research",
            "specialization": specialization,
            "communication_protocols": ["json", "protobuf"]
        }
You need to host the AgentCard at /.well-known/agent.json on your server during deployment. The JSON file has this significant information:
- Agent's name and description
- Endpoint URL for A2A requests
- Authentication requirements
- Protocol version compatibility
- Capabilities (streaming, push notifications)
- Skills array detailing specific functionalities
This self-documenting approach makes automatic discovery and connection between agents possible without manual setup.
Running agents on separate ports using uv
A2A systems usually involve multiple agents running at the same time. You'll need to configure them on different ports:
## Terminal 1: Run the first agent on port 10000
cd samples/python/agents/adk
uv run . --port 10000

## Terminal 2: Run the second agent on port 10001
cd samples/python/agents/langgraph
uv run . --port 10001
The uv tool makes running agents with custom configurations easier. Each agent needs its own port because they work as separate HTTP servers that listen for A2A protocol requests.
You can test your agents with the A2A command-line client:
## Connect to an agent
cd samples/python/hosts/cli
uv run . --agent http://localhost:10000
This starts a connection where the client gets the AgentCard to check capabilities. You can then interact with the agent directly through the command line. The A2A web UI also lets you visually manage and watch multi-agent communications after you register your agents through their HTTP endpoints.
Connecting Agents with the Google A2A Protocol
Communication between agents is the foundation of any Google A2A project. Once you create individual agents, you need to connect them through the Agent-to-Agent (A2A) protocol. This makes shared work possible between agents, whatever their underlying frameworks.
Understanding tasks/send and tasks/sendSubscribe
The A2A protocol provides two main methods to communicate tasks. Each method serves a different purpose. The tasks/send endpoint follows a synchronous request/response pattern that works best for quick operations. The client agent waits until the remote agent processes the task and sends back a response.
## Example of tasks/send request
response = requests.post(
	f"{agent_url}/tasks/send",
    headers={"Authorization": f"Bearer {api_key}"},
    json={
    	"taskId": str(uuid.uuid4()),
        "message": {"role": "user", "content": "Convert 100 USD to EUR"}
    }
)
tasks/sendSubscribe creates a streaming connection that delivers updates as tasks progress. This method uses Server-Sent Events (SSE) to establish a lasting connection. The remote agent can push updates without multiple client requests. This approach works best for:
- Tasks that produce incremental output
- Operations that need progress tracking
- Interactive sessions that require quick feedback
SSE operates over HTTP with the Content-Type: text/event-stream header. It sends updates as TaskStatusUpdateEvent to show state changes and TaskArtifactUpdateEvent to deliver partial or final results.
Trickle AI offers visualization tools to track these A2A communications. These tools help you debug and optimize how agents exchange tasks.
Registering agents in the A2A demo UI
The A2A demo application lets you test multi-agent communications through a simple web interface. Here's how to register agents:
- Launch the demo UI and make sure your agents run on separate ports
- Click the robot icon (🤖) in the sidebar
- Click the arrow up icon (⬆️) to add an agent
- Enter localhost:10000 (without http://)
- Click Read to fetch the agent's capabilities
- Click Save to register the agent
- Repeat for additional agents on other ports (10001, 10002, etc.)
After registration, the host agent can find each remote agent's capabilities through its AgentCard. This helps the host route requests to the most suitable specialized agent based on its advertised skills.
Handling input-required states and multi-turn interactions
A2A's strength lies in supporting multi-turn conversations between agents. Tasks move through specific states: submitted, working, input-required, completed, failed, and canceled.
The input-required state is vital for interactive dialogs. Agents can pause execution when they need clarification. They set the task status to input-required and return a clarifying question. Here's an example:
## Agent realizes it needs more information
return TaskStatusUpdateEvent(
	state="input-required",
    message=Message(role="assistant", content="To which currency do you want to convert?")
)
This mechanism shines because client responses use the same Task ID as the original request. This maintains context across multiple interactions. A2A supports structured data exchange through DataParts in Artifacts. You can create rich interactions like forms:
## Agent requests structured input via a form
return TaskArtifactUpdateEvent(
	artifact=Artifact(
    	parts=[DataPart(
        	data={"fields": [{"name": "date", "type": "date"}, {"name": "amount", "type": "number"}]}        		)]
     )
)
The demo UI recognizes this structure and creates an interactive HTML form. It sends filled values back to the agent using the original Task ID. This shows A2A's capability to handle complex, structured interactions.
This standardized protocol lets agents participate in detailed collaboration. They can ask for clarifications, suggest changes, delegate sub-tasks, and intervene when problems arise.
Materials and Methods: Project Structure and Tooling

A well-organized A2A project will help you maintain your multi-agent system as it grows. The right structure, monitoring, and security practices are the foundations of production-ready applications.
Directory layout for multi-agent systems
A modular directory structure works best for A2A projects. It keeps different parts separate while letting agents communicate smoothly. Here's a layout that works well:
your-a2a-project/
├── agents/              # Individual agent implementations
│   ├── langraph_agent/  # LangGraph-based agent
│   ├── crewai_agent/    # CrewAI-based agent
│   └── adk_agent/       # Google ADK-based agent
├── common/              # Shared utilities
│   ├── a2a_client.py    # A2A protocol client
│   └── a2a_server.py    # Server wrapper for agents
├── shared/              # Cross-agent schemas and models
│   └── schemas.py       # Pydantic models for data exchange
└── host/                # Orchestration components
	└── main.py          # Entry point for host agent
This setup keeps agent code separate and lets you reuse common utilities. Each agent runs on its own port, which creates a distributed system where parts can grow independently.
Managing environment variables and API keys
Your A2A project needs secure credential handling. Start by making a .env file in your project root:
GOOGLE_API_KEY=your_key_here
PORT=3000
Load these variables when your application starts using the dotenv package:
import dotenv
dotenv.load_dotenv()
Production systems need extra security steps:
- Keep
.envfiles out of your repository (add to.gitignore) - Use separate API keys for development and production
- Lock down API key permissions in Google Cloud Console
- Set up a dedicated service account for agent communication
Good environment variable setup helps you move between development and production while keeping everything secure.
Limitations and Troubleshooting Tips
A2A projects often need multiple agents running at the same time. This setup can create technical challenges. Let's get into common problems and solutions when working with the Google A2A protocol.
Common port conflicts and how to solve them
Port conflicts become a major roadblock in multi-agent systems with Google A2A. The problems happen when two or more agents try to use the same network port. This causes connection failures and breaks agent communication.
Error messages like "Address already in use" or silent failures show these port conflicts. The problems often pop up with popular ports like 8081, which many development frameworks use by default.
Here are some practical steps to find and fix port conflicts:
1. Identify the conflicting process using terminal commands:
## On Linux/macOS
sudo lsof -i :3000

## On Windows
netstat -ano | findstr :3000
2. Terminate the conflicting process after finding it. You can close the application or use:
## On Linux/macOS (replace 1234 with actual PID)
kill -9 1234

## On Windows
taskkill /PID 1234 /F
3. Implement dynamic port assignment in your A2A applications:
## Find available port
def find_available_port(start_port=8000):
	port = start_port
    while is_port_in_use(port):
    	port += 1
    return port
Planning your port allocation strategy beforehand makes more sense. You can reserve specific port ranges for different agent types. LangGraph agents could use 10000-10099, while CrewAI agents take 10100-10199.
Complex agent systems might still run into networking issues. Trickle AI helps you see agent communications clearly and spot connection failures quickly. You can watch the packet flow between agents to find bottlenecks or communication problems.
Complete connectivity checks help verify network setups, firewall settings, and potential IP conflicts. These checks create reliable communication channels that every serious Google A2A project needs.
Projects like React Native can't automatically fix port conflicts. This makes proactive port management crucial. Good planning and reliable troubleshooting techniques help you build flexible A2A systems with solid agent communication.
FAQs
Q1. What is Google A2A and why is it important for AI development?
Google A2A is an open protocol that enables seamless communication between different AI frameworks. It's important because it allows AI agents built with various tools to collaborate effectively, breaking down traditional barriers in AI development.
Q2. What are the key components needed to set up an A2A development environment?
To set up an A2A development environment, you need Python 3.12 or higher, the uv package manager, and the official A2A GitHub repository. You'll also need to install dependencies for frameworks like LangGraph, CrewAI, and Google ADK.
Q3. How do agents communicate using the A2A protocol?
Agents communicate using two main methods: tasks/send for quick, synchronous operations, and tasks/sendSubscribe for streaming connections that provide live updates. These methods allow agents to exchange tasks, request information, and collaborate on complex problems.
Q4. What is an AgentCard and why is it important in A2A projects?
An AgentCard is like a digital identity card for an agent, advertising its capabilities to other agents. It's crucial because it allows for automatic discovery and connection between agents, facilitating efficient collaboration without manual configuration.
Q5. How can developers monitor and debug complex A2A systems?
Developers can use tools like Trickle AI to monitor and debug A2A systems. Trickle AI provides visualization tools that help trace A2A communications, making it easier to understand agent interactions, track task statuses, and optimize overall system performance.