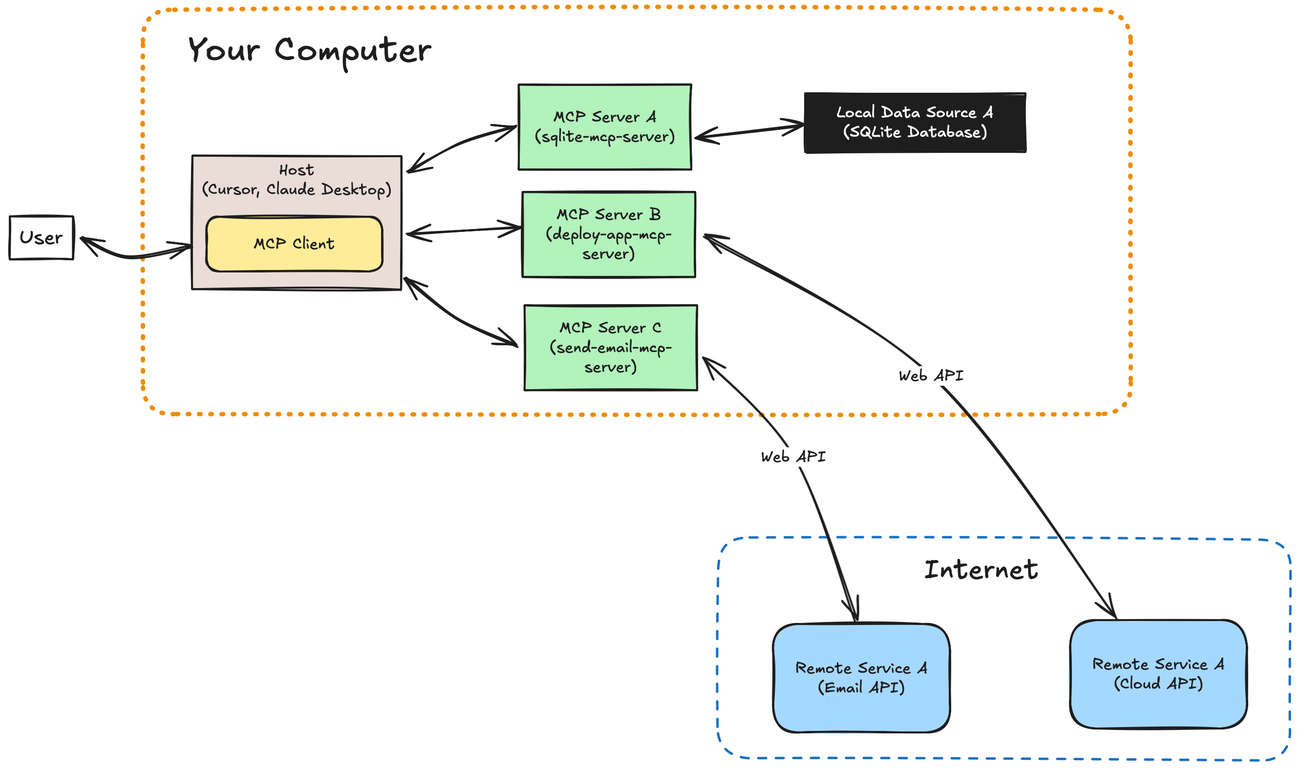
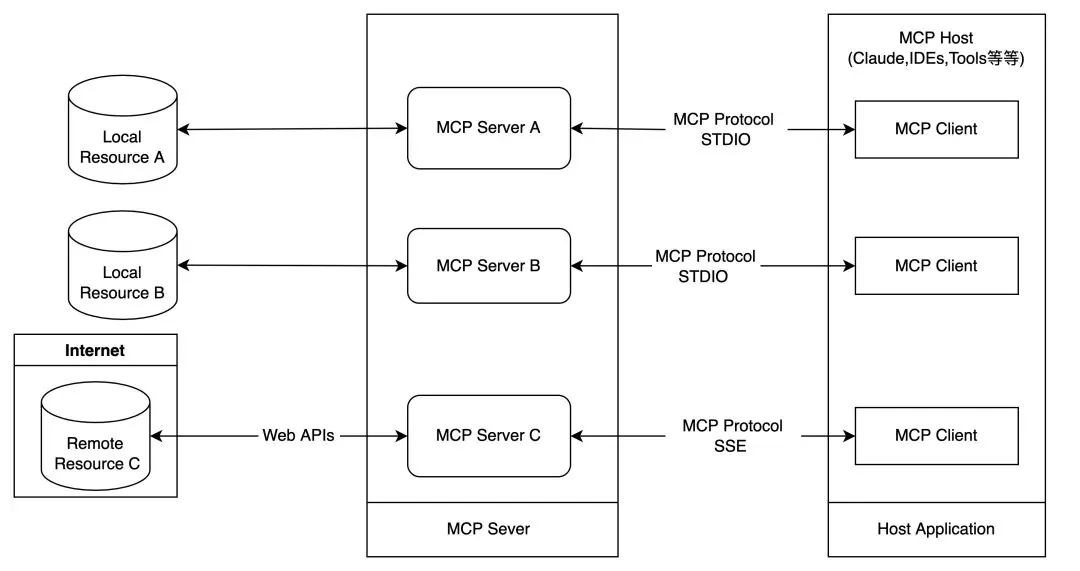
Anthropic created the Model Context Protocol (MCP) in early 2024. This breakthrough has changed how AI systems work together by simplifying complex connections from M×N to M+N. The protocol serves as a universal connector for large language models (LLMs) that enables smooth communication between AI systems and external tools.
The protocol's client-server design has caught on quickly. More than a thousand community-built servers exist now, along with many official company integrations. This piece will show you how to create your own MCP server, connect external APIs, and set up reliable connections with Claude Desktop. You will learn to use MCP's standard framework to build flexible AI applications that work seamlessly with data sources and tools of all types.
Ready to build your first MCP integration?
Setting Up Your MCP Development Environment
You need a proper development environment to create any Model Context Protocol. The right setup is a vital part of successful implementation. MCP servers work best with specific tools and configurations when you connect them to LLMs like Claude.
Installing Python 3.10+ and uv Package Manager
Python 3.10 or newer versions are the most important requirement for MCP development. These versions have advanced features you need for modern AI development workflows. Python 3.10 came out in October 2021. It brought structural pattern matching, explicit type aliases, and other features that MCP servers need for complex operations.
To install Python 3.10+:
- Go to the official Python download page (https://www.python.org/downloads/)
- Download the installer that matches your operating system
- Windows users should check both "Install launcher for all users" and "Add python.exe to PATH" options during installation
- Open your terminal and run
python --versionto check the installation
The next step after Python installation is setting up the uv package manager. It's better than traditional tools like pip or conda. The uv package manager is great for MCP development because it gives you:
- Quick package installation and dependency resolution
- Easy environment management
- Support for all Python project tools
- Works with existing pip workflows
You can install uv based on your operating system:
For macOS/Linux:
curl -LsSf <https://astral.sh/uv/install.sh> | sh
For Windows:
powershell -ExecutionPolicy ByPass -c "irm <https://astral.sh/uv/install.ps1> | iex"
Remember to restart your terminal so the uv command works properly.
Creating a Virtual Environment for MCP Projects
Now that you have Python and uv, you can create a special environment for your MCP projects. Virtual environments keep your dependencies separate and stop conflicts between projects.
Start by creating and moving to a new project directory:
uv init my-mcp-project
cd my-mcp-project
Then create and start your virtual environment:
For macOS/Linux:
uv venv
source .venv/bin/activate
For Windows:
uv venv
.venv\\Scripts\\activate
You can type deactivate anytime to exit the environment.
Install the MCP SDK and other needed packages in your active environment:
uv add "mcp[cli]" requests python-dotenv
You'll need to manage your credentials properly when your MCP servers connect to external services. Create a .env file in your project's main folder to store API keys safely:
touch .env
echo ".env" >> .gitignore
A typical MCP project should be organized like this:
my-mcp-project/
├── .env                # Environment variables
├── .gitignore          # Git ignore file
├── .venv/              # Virtual environment folder
├── src/                # Source code directory
│   └── server.py       # Main MCP server code
└── requirements.txt    # Project dependencies
This layout gives you a strong base to build MCP servers. They can work with Claude Desktop and other LLM clients while keeping your code organized and configurations secure.
Building Your First MCP Server with Python SDK
Python's FastMCP framework makes building a working MCP server easier. The framework's user-friendly API simplifies development by handling complex protocol details in the background.
Initializing FastMCP() with Server Name
You start an MCP server by creating a FastMCP class instance. This object handles connections, protocol details, and routing:
from mcp.server.fastmcp import FastMCP

# Create a server with a descriptive name
mcp = FastMCP("My First MCP Server")
print(f"Starting server {mcp.name}")
Your server's name shows up in logs and client applications. While it's optional and defaults to "FastMCP", a descriptive name helps debug issues when you run multiple servers.
Defining Tools with @mcp.tool() Decorator
The next step lets you create tools that Claude or other LLMs can use. These tools are Python functions that do specific tasks when an AI assistant calls them:
@mcp.tool()
def calculate_sum(a: float, b: float) -> str:
    """Add two numbers together.

    Args:
        a: First number to add
        b: Second number to add
    """
    result = a + b
    return str(result)
FastMCP creates tool definitions from Python type hints and docstrings automatically. The example above shows a tool that Claude uses to add numbers.
You can build more complex tools that handle API calls or analyze data:
@mcp.tool(
    annotations={
        "title": "Weather Forecast",
        "readOnlyHint": True
    }
)
async def get_forecast(latitude: float, longitude: float) -> str:
    """Get weather forecast for a location.

    Args:
        latitude: Latitude of the location
        longitude: Longitude of the location
    """
    # API call implementation would go here
    return "Forecast data would appear here"
Type hints in these functions help FastMCP generate the right JSON schema. This helps Claude understand how to use each tool properly.
Connecting to Claude Desktop via stdio Transport
The last step connects your MCP server to Claude Desktop through a transport mechanism. Local development works best with stdio (standard input/output):
if __name__ == "__main__":
    # Run the server with stdio transport
    mcp.run(transport="stdio")
This setup lets Claude Desktop launch your server as a child process and communicate through standard input/output streams. The transport method gives you:
- Quick response times without network delays
- Better security since there's no network exposure
- Easy setup without an HTTP server
Here's how to connect your server to Claude Desktop:
- Run your MCP server script:
python server.pyor usefastmcp run server.py - Open Claude Desktop and go to Settings > Tool Providers
- Add a new tool provider with Stdio transport
- Type the command that runs your server
Trickle AI helps you debug during development. You can see how Claude works with your MCP server, which makes fixing issues easier.
Here's what the complete server with both tools looks like:
from mcp.server.fastmcp import FastMCP

mcp = FastMCP("Tutorial Server")

@mcp.tool()
def calculate_sum(a: float, b: float) -> str:
    """Add two numbers together."""
    return str(a + b)

@mcp.tool()
def get_forecast(latitude: float, longitude: float) -> str:
    """Get weather forecast for a location."""
    # Implementation would go here
    return "Forecast data would appear here"

if __name__ == "__main__":
    mcp.run(transport="stdio")
After connecting, Claude Desktop can find and use your tools through natural language interactions.
Integrating External APIs and Tools into MCP
You can expand your MCP server's capabilities by connecting it to external services. Let me show you how to link your Model Context Protocol server with useful external tools and APIs to boost its functionality.
GitHub PR Analysis using fetch_pr_changes()
MCP shows its true potential when it analyzes code changes through external APIs. The fetch_pr_changes() implementation lets you get detailed pull request information from GitHub:
@mcp.tool()
async def fetch_pr(repo_owner: str, repo_name: str, pr_number: int) -> Dict[str, Any]:
    """Fetch changes from a GitHub pull request."""
    print(f"Fetching PR #{pr_number} from {repo_owner}/{repo_name}", file=sys.stderr)
    try:
        pr_info = fetch_pr_changes(repo_owner, repo_name, pr_number)
        return pr_info if pr_info else {}
    except Exception as e:
        print(f"Error fetching PR: {str(e)}", file=sys.stderr)
        return {}
The fetch_pr_changes() function sends authenticated HTTP requests to GitHub's API and gets both PR metadata and file-level changes. It returns structured data with the PR's title, description, author details, and file modifications - perfect for AI analysis of code changes.
Notion Integration with notion-client
Notion integration starts with creating an integration at Notion's integrations dashboard to get an API key. Here's how to set up the connection:
from notion_client import Client

# Initialize the Notion client
notion_api_key = os.getenv("NOTION_API_KEY")
notion_page_id = os.getenv("NOTION_PAGE_ID")
notion = Client(auth=notion_api_key)

@mcp.tool()
async def create_notion_page(title: str, content: str) -> str:
    """Create a Notion page with analysis results."""
    try:
        notion.pages.create(
            parent={"type": "page_id", "page_id": notion_page_id},
            properties={"title": {"title": [{"text": {"content": title}}]}},
            children=[{
                "object": "block",
                "type": "paragraph",
                "paragraph": {
                    "rich_text": [{"type": "text", "text": {"content": content}}]
                }
            }]
        )
        return f"Notion page '{title}' created successfully!"
    except Exception as e:
        return f"Error creating Notion page: {str(e)}"
This tool enables Claude to create pages in Notion with structured content and serves as a great way to generate documentation.
Materials and Methods: Project Structure and Tooling
Your MCP development workflow becomes smoother with a well-laid-out approach to organizing files and dependencies. The server stays manageable as complexity grows when you follow time-tested patterns instead of piecing together quick fixes.
Directory Layout for Modular MCP Servers
A proper directory structure plays a vital role in developing expandable Model Context Protocol servers. MCP projects work best with this layout:
mcp-project/
├── README.md                # Project documentation
├── .env                     # Environment variables (not in version control)
├── .gitignore               # Excludes .env and virtual environment
├── pyproject.toml           # Project configuration
├── requirements.txt         # Dependency specifications
├── src/                     # Source code directory
│   ├── server.py            # Main MCP server implementation
│   ├── tools/               # Tool implementations
│   └── resources/           # Resource definitions
└── tests/                   # Test directory
This layout keeps components isolated. Your codebase becomes easier to maintain and expand. Tools like Trickle AI can monitor your MCP implementation better with these standardized structures.
Environment Variables Setup with dotenv
Python's dotenv library gives you a clean way to manage secure credentials when building MCP servers that connect to external APIs:
# At the top of server.py
import os
from dotenv import load_dotenv

# Load variables from .env file
load_dotenv()

# Access values safely
github_token = os.getenv("GITHUB_TOKEN")
notion_api_key = os.getenv("NOTION_API_KEY")
Start by creating a .env file in your project root to store sensitive information:
GITHUB_TOKEN=your_github_token
NOTION_API_KEY=your_notion_api_key
NOTION_PAGE_ID=your_notion_page_id
Remember to add .env to your .gitignore file. This prevents credentials from ending up in version control.
Dependency Management with uv and requirements.txt
The uv package manager beats traditional tools for MCP development. It installs packages faster and manages environments better. List your core dependencies in requirements.txt:
mcp[cli]
requests
python-dotenv
notion-client
You can install these dependencies with:
uv pip install -r requirements.txt
Direct dependency management works with uv commands too:
uv add "mcp[cli]" requests python-dotenv
The uv tool makes package management efficient while working seamlessly with existing Python workflows. This makes it perfect for Model Context Protocol development.
Results and Limitations of the MCP Server
MCP server implementations come with practical challenges that developers must prepare for. My extensive testing with MCP implementations has revealed several performance factors that affect ground deployments.
Observed Latency in Claude Desktop Interactions
Tests show that MCP servers linked to Claude Desktop face latency challenges that degrade user experience. Human-AI interactions through MCP run nowhere near as fast as regular human-directed computer actions. Your model context protocol server development should focus on use cases where speed matters less, such as background information gathering or automated software testing in trusted environments.
Latency and throughput serve as fundamental metrics that show MCP server responsiveness. These metrics work like a system's heartbeat and lung capacity. Performance monitoring with Trickle AI reveals compounded latency problems when:
- Multiple requests arrive at once
- Claude's tools trigger complex computations
- External API calls add more delays
Block's MCP integration shows optimized performance and handles over 12,000 daily tool invocations with sub-200ms latency. All the same, this level of performance needs complete optimization strategies. Teams must cache frequently accessed data and batch-process repetitive tasks.
Limitations of stdio Transport in Multi-threaded Environments
Stdio transport offers efficiency for local development but comes with notable limitations. The transport demands strict message handling—servers must output only valid MCP messages to stdout, while clients must input only valid messages to stdin.
Stdio transport proves problematic for multi-threaded environments. Multi-threading creates several challenges:
- Error handling becomes tricky as stderr outputs mix together
- Clients need to spawn the MCP server as a subprocess
- MCP Inspector adds an SSE layer even with stdio servers
Developers often encounter the "SSE connection not established" error because MCP Inspector tries to use SSE with stdio transports. As your model context protocol tutorial grows more complex, HTTP+SSE transport offers better multi-threading support despite added network overhead.
Conclusion
This complete guide gives developers everything in building Model Context Protocol servers. The tutorial explores development environment setup, MCP server creation using FastMCP, and external API connections that work.
Developers learned how to:
- Configure Python 3.10+ and uv package manager for MCP development
- Build MCP servers that communicate with Claude Desktop
- Integrate external services like GitHub and Notion
- Structure projects for maintainability and scalability
- Handle common performance challenges
MCP reduces integration complexity from M×N to M+N connections substantially. Developers should think about performance implications when designing their implementations. Tools like Trickle AI are a great way to get live debugging capabilities that help identify and solve bottlenecks quickly.
The stdio transport method works perfectly for original development. Production deployments might need a switch to HTTP+SSE. Careful planning of deployment requirements is a vital part of successful MCP implementations.
Strong AI integrations that scale effectively emerge from this foundation. These basic concepts are the foundations of advanced implementations as the MCP ecosystem expands. Development teams will find AI capabilities more available and easier to manage.
FAQs
Q1. What is the Model Context Protocol (MCP) and why is it important for developers?
The Model Context Protocol is an open standard that simplifies AI integration by reducing the complexity of connections between AI systems and external tools. It's important for developers because it enables standardized communication between large language models and various data sources, making it easier to build scalable AI applications.
Q2. How do I set up a development environment for MCP projects?
To set up an MCP development environment, install Python 3.10+ and the uv package manager. Create a virtual environment for your project, install the MCP SDK and other dependencies using uv, and set up a .env file for secure credential management. This setup provides a solid foundation for developing MCP servers.
Q3. What are the key steps to build a basic MCP server?
To build a basic MCP server, initialize FastMCP() with a server name, define tools using the @mcp.tool() decorator, and connect to Claude Desktop via stdio transport. This allows you to create a functional server that can interact with AI assistants and perform specific tasks when called.
Q4. How can I integrate external APIs into my MCP server?
You can integrate external APIs into your MCP server by creating tool functions that make API calls. For example, you can implement functions to analyze GitHub pull requests, create Notion pages, or fetch weather forecasts. These integrations expand the capabilities of your MCP server and allow AI assistants to interact with external services.
Q5. What are some limitations of MCP servers and how can they be addressed?
MCP servers may face latency challenges, especially when handling multiple requests or complex computations. The stdio transport method has limitations in multi-threaded environments. To address these issues, consider optimizing performance through caching and batch processing, and consider switching to HTTP+SSE transport for better multi-threading support in production deployments.